Netty 实现聊天功能
Netty 是一个 Java NIO 客户端服务器框架,使用它可以快速简单地开发网络应用程序,比如服务器和客户端的协议。Netty 大大简化了网络程序的开发过程比如 TCP 和 UDP 的 socket 服务的开发。更多关于 Netty 的知识,可以参阅《Netty 4.x 用户指南》(https://github.com/waylau/netty-4-user-guide)
下面,就基于 Netty 快速实现一个聊天小程序。
准备
- JDK 7+
- Maven 3.2.x
- Netty 4.x
- Eclipse 4.x
服务端
让我们从 handler (处理器)的实现开始,handler 是由 Netty 生成用来处理 I/O 事件的。
SimpleChatServerHandler.java
public class SimpleChatServerHandler extends SimpleChannelInboundHandler<String> { // (1)

	public static ChannelGroup channels = new DefaultChannelGroup(GlobalEventExecutor.INSTANCE);

    @Override
    public void handlerAdded(ChannelHandlerContext ctx) throws Exception {  // (2)
		Channel incoming = ctx.channel();

		// Broadcast a message to multiple Channels
		channels.writeAndFlush("[SERVER] - " + incoming.remoteAddress() + " 加入\n");

		channels.add(ctx.channel());
    }

    @Override
    public void handlerRemoved(ChannelHandlerContext ctx) throws Exception {  // (3)
		Channel incoming = ctx.channel();

		// Broadcast a message to multiple Channels
		channels.writeAndFlush("[SERVER] - " + incoming.remoteAddress() + " 离开\n");

		// A closed Channel is automatically removed from ChannelGroup,
		// so there is no need to do "channels.remove(ctx.channel());"
    }

    @Override
	protected void channelRead0(ChannelHandlerContext ctx, String s) throws Exception { // (4)
		Channel incoming = ctx.channel();
		for (Channel channel : channels) {
            if (channel != incoming){
                channel.writeAndFlush("[" + incoming.remoteAddress() + "]" + s + "\n");
            } else {
            	channel.writeAndFlush("[you]" + s + "\n");
            }
        }
	}

	@Override
	public void channelActive(ChannelHandlerContext ctx) throws Exception { // (5)
        Channel incoming = ctx.channel();
		System.out.println("SimpleChatClient:"+incoming.remoteAddress()+"在线");
	}

	@Override
	public void channelInactive(ChannelHandlerContext ctx) throws Exception { // (6)
        Channel incoming = ctx.channel();
		System.out.println("SimpleChatClient:"+incoming.remoteAddress()+"掉线");
	}
    @Override
    public void exceptionCaught(ChannelHandlerContext ctx, Throwable cause) { // (7)
    	Channel incoming = ctx.channel();
		System.out.println("SimpleChatClient:"+incoming.remoteAddress()+"异常");
        // 当出现异常就关闭连接
        cause.printStackTrace();
        ctx.close();
    }
}
-
SimpleChatServerHandler 继承自 SimpleChannelInboundHandler,这个类实现了 ChannelInboundHandler 接口,ChannelInboundHandler 提供了许多事件处理的接口方法,然后你可以覆盖这些方法。现在仅仅只需要继承 SimpleChannelInboundHandler 类而不是你自己去实现接口方法。
-
覆盖了 handlerAdded() 事件处理方法。每当从服务端收到新的客户端连接时,客户端的 Channel 存入 ChannelGroup 列表中,并通知列表中的其他客户端 Channel
-
覆盖了 handlerRemoved() 事件处理方法。每当从服务端收到客户端断开时,客户端的 Channel 自动从 ChannelGroup 列表中移除了,并通知列表中的其他客户端 Channel
-
覆盖了 channelRead0() 事件处理方法。每当从服务端读到客户端写入信息时,将信息转发给其他客户端的 Channel。其中如果你使用的是 Netty 5.x 版本时,需要把 channelRead0() 重命名为messageReceived()
-
覆盖了 channelActive() 事件处理方法。服务端监听到客户端活动
-
覆盖了 channelInactive() 事件处理方法。服务端监听到客户端不活动
-
exceptionCaught() 事件处理方法是当出现 Throwable 对象才会被调用,即当 Netty 由于 IO 错误或者处理器在处理事件时抛出的异常时。在大部分情况下,捕获的异常应该被记录下来并且把关联的 channel 给关闭掉。然而这个方法的处理方式会在遇到不同异常的情况下有不同的实现,比如你可能想在关闭连接之前发送一个错误码的响应消息。
SimpleChatServerInitializer.java
SimpleChatServerInitializer 用来增加多个的处理类到 ChannelPipeline 上,包括编码、解码、SimpleChatServerHandler 等。
public class SimpleChatServerInitializer extends
		ChannelInitializer<SocketChannel> {

	@Override
    public void initChannel(SocketChannel ch) throws Exception {
		 ChannelPipeline pipeline = ch.pipeline();

        pipeline.addLast("framer", new DelimiterBasedFrameDecoder(8192, Delimiters.lineDelimiter()));
        pipeline.addLast("decoder", new StringDecoder());
        pipeline.addLast("encoder", new StringEncoder());
        pipeline.addLast("handler", new SimpleChatServerHandler());

		System.out.println("SimpleChatClient:"+ch.remoteAddress() +"连接上");
    }
}
SimpleChatServer.java
编写一个 main() 方法来启动服务端。
public class SimpleChatServer {

    private int port;

    public SimpleChatServer(int port) {
        this.port = port;
    }

    public void run() throws Exception {

        EventLoopGroup bossGroup = new NioEventLoopGroup(); // (1)
        EventLoopGroup workerGroup = new NioEventLoopGroup();
        try {
            ServerBootstrap b = new ServerBootstrap(); // (2)
            b.group(bossGroup, workerGroup)
             .channel(NioServerSocketChannel.class) // (3)
             .childHandler(new SimpleChatServerInitializer())  //(4)
             .option(ChannelOption.SO_BACKLOG, 128)          // (5)
             .childOption(ChannelOption.SO_KEEPALIVE, true); // (6)

    		System.out.println("SimpleChatServer 启动了");

            // 绑定端口,开始接收进来的连接
            ChannelFuture f = b.bind(port).sync(); // (7)

            // 等待服务器  socket 关闭 。
            // 在这个例子中,这不会发生,但你可以优雅地关闭你的服务器。
            f.channel().closeFuture().sync();

        } finally {
            workerGroup.shutdownGracefully();
            bossGroup.shutdownGracefully();

    		System.out.println("SimpleChatServer 关闭了");
        }
    }

    public static void main(String[] args) throws Exception {
        int port;
        if (args.length > 0) {
            port = Integer.parseInt(args[0]);
        } else {
            port = 8080;
        }
        new SimpleChatServer(port).run();

    }
}
-
NioEventLoopGroup 是用来处理I/O操作的多线程事件循环器,Netty 提供了许多不同的 EventLoopGroup 的实现用来处理不同的传输。在这个例子中我们实现了一个服务端的应用,因此会有2个 NioEventLoopGroup 会被使用。第一个经常被叫做‘boss’,用来接收进来的连接。第二个经常被叫做‘worker’,用来处理已经被接收的连接,一旦‘boss’接收到连接,就会把连接信息注册到‘worker’上。如何知道多少个线程已经被使用,如何映射到已经创建的 Channel上都需要依赖于 EventLoopGroup 的实现,并且可以通过构造函数来配置他们的关系。
-
ServerBootstrap 是一个启动 NIO 服务的辅助启动类。你可以在这个服务中直接使用 Channel,但是这会是一个复杂的处理过程,在很多情况下你并不需要这样做。
-
这里我们指定使用 NioServerSocketChannel 类来举例说明一个新的 Channel 如何接收进来的连接。
-
这里的事件处理类经常会被用来处理一个最近的已经接收的 Channel。SimpleChatServerInitializer 继承自ChannelInitializer 是一个特殊的处理类,他的目的是帮助使用者配置一个新的 Channel。也许你想通过增加一些处理类比如 SimpleChatServerHandler 来配置一个新的 Channel 或者其对应的ChannelPipeline 来实现你的网络程序。当你的程序变的复杂时,可能你会增加更多的处理类到 pipline 上,然后提取这些匿名类到最顶层的类上。
-
你可以设置这里指定的 Channel 实现的配置参数。我们正在写一个TCP/IP 的服务端,因此我们被允许设置 socket 的参数选项比如tcpNoDelay 和 keepAlive。请参考 ChannelOption 和详细的 ChannelConfig 实现的接口文档以此可以对ChannelOption 的有一个大概的认识。
-
option() 是提供给NioServerSocketChannel 用来接收进来的连接。childOption() 是提供给由父管道 ServerChannel 接收到的连接,在这个例子中也是 NioServerSocketChannel。
-
我们继续,剩下的就是绑定端口然后启动服务。这里我们在机器上绑定了机器所有网卡上的 8080 端口。当然现在你可以多次调用 bind() 方法(基于不同绑定地址)。
恭喜!你已经完成了基于 Netty 聊天服务端程序。
客户端
SimpleChatClientHandler.java
客户端的处理类比较简单,只需要将读到的信息打印出来即可
public class SimpleChatClientHandler extends  SimpleChannelInboundHandler<String> {
	@Override
	protected void channelRead0(ChannelHandlerContext ctx, String s) throws Exception {
		System.out.println(s);
	}
}
SimpleChatClientInitializer.java
与服务端类似
public class SimpleChatClientInitializer extends ChannelInitializer<SocketChannel> {

	@Override
    public void initChannel(SocketChannel ch) throws Exception {
        ChannelPipeline pipeline = ch.pipeline();

        pipeline.addLast("framer", new DelimiterBasedFrameDecoder(8192, Delimiters.lineDelimiter()));
        pipeline.addLast("decoder", new StringDecoder());
        pipeline.addLast("encoder", new StringEncoder());
        pipeline.addLast("handler", new SimpleChatClientHandler());
    }
}
SimpleChatClient.java
编写一个 main() 方法来启动客户端。
public class SimpleChatClient {
	public static void main(String[] args) throws Exception{
	        new SimpleChatClient("localhost", 8080).run();
	    }

	    private final String host;
	    private final int port;

	    public SimpleChatClient(String host, int port){
	        this.host = host;
	        this.port = port;
	    }

	    public void run() throws Exception{
	        EventLoopGroup group = new NioEventLoopGroup();
	        try {
	            Bootstrap bootstrap  = new Bootstrap()
	                    .group(group)
	                    .channel(NioSocketChannel.class)
	                    .handler(new SimpleChatClientInitializer());
	            Channel channel = bootstrap.connect(host, port).sync().channel();
	            BufferedReader in = new BufferedReader(new InputStreamReader(System.in));
	            while(true){
	                channel.writeAndFlush(in.readLine() + "\r\n");
	            }
	        } catch (Exception e) {
	            e.printStackTrace();
	        } finally {
	            group.shutdownGracefully();
	        }

	    }
    }

}
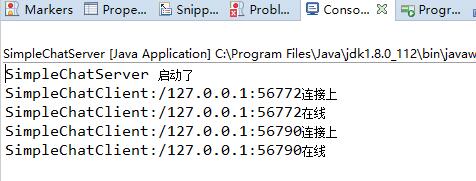
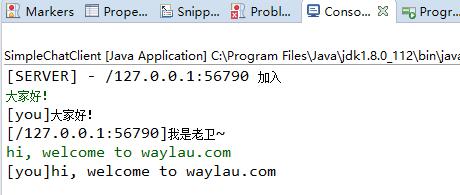
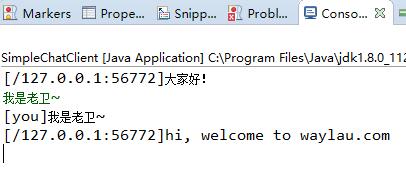
运行效果
先运行 SimpleChatServer,再可以运行多个 SimpleChatClient,控制台输入文本继续测试
源码
见 https://github.com/waylau/netty-4-user-guide-demos 中 simplechat
参考
- Netty 4.x 用户指南 https://github.com/waylau/netty-4-user-guide