在Windows环境下用Yeoman构建AngularJS项目
目录
- 认识Yeoman
- 设置开发环境
- 安装 Yeoman 生成器
- 使用脚手架
- 预览 Yeoman 生成的应用
- 浏览器中预览应用
- 写一个自己的 AngularJS 应用
- 使用 Bower 安装包
- 用 Karma 和 Jasmine 进行测试
- 准备发布产品
- 本地存储来持久化数据
- 总结
- 参考
- 源码
本文将通过 Yeoman 创建一个 AngularJS 应用,同时 也能感受到 Grunt 和 Bower 的功能。
认识Yeoman

Yeoman 是一位戴帽子、立意奇颖的人。
Yeoman 是一套工作流程。
Yeoman 是Web 应用开发脚手架。
通过很少的命令,就能给你整个应用或者独立的模块生成模板代码,比如控制器或者模型。Yeoman 可以启动预览 Web 服务器,观察文件,如果被编辑,就会重新加载的变化和编译你的 Sass 。 Yeoman 也可以运行单元测试,最小化代码,优化图像等等。
Yeoman 致力于提高你在构建web应用时的生产力和舒适度,优化工作流程。用到三种核心工具:yo(脚手架工具),grunt(构建工具),bower(包管理工具)。

Yo 一个用于构建特定框架的生态系统的代码工具,称之为生成器(generator)。使用 yo 就能提前处理那些些繁琐的任务。
Grunt 被用来构建,预览以及测试你的项目,感谢来自那些由 Yeoman 团队和 grunt-contrib 所管理的任务的帮助。
Bower 被用来进行依赖管理,所以你不再需要手动的下载和管理你的脚本了。
你能使用 npm 安装生成器,现在可用的生成器数量已经超过了 1000+个生成器,这其中很多都是由开源社区编写的。比较受欢迎的有 generator-angular、 generator-backbone、 generator-ember。
##为何用 Yeoman
Yeoman 是一个强大的有想法的客户端栈,包括那些能帮助开发者快速构建漂亮web应用的工具和框架。我们关注于提供所有应用上手所需要的东西,尽量免去所有手动安装的麻烦。
采用了可以扩展的模块化架构,我们利用来自一些开源社区的成功经验和教训来确保开发者使用的栈尽可能的智能。
作为一个良好的文档和深思熟虑的构建过程的坚定的拥趸,Yeoman 包括了对代码规范检测,测试,最小化以及更多其他功能的支持,所以开发者可以专注于解决方案而不用担心这些零散的东西。
Yeoman 是快速的,高性能的并且经过优化可以很好的在现代浏览器中工作。
设置开发环境
大部分通过命令行形式与 Yeoman 相互作用。支持MAC、Linux、Windows等名称。本文以 Windows 为例,用cmd.exe
##安装前提
安装 Yeoman, 先要安装:
确认安装成功:
$ node –version && npm –version

$ git –version

##安装 Yeoman 工具集
该工具集包括了 Yeoman、Bower、Grunt
$ npm install –global yo
完成后出现如下界面:

确认安装成功
$ yo –version && bower –version && grunt –version
出现
C:\Users\Administrator>yo –version && bower –version && grunt –version [?] ========================================================================== We’re constantly looking for ways to make yo better! May we anonymously report usage statistics to improve the tool over time? More info: https://github.com/yeoman/insight & http://yeoman.io ==========================================================================: (Y/n )
意思是说,是否愿意上报使用统计。输入 y 或者 n 或者任意字符,继续
则会显示三个版本信息,分别是 Yeoman、Bower、Grunt CLI 的。说明yeoman 安装成功。

安装 Yeoman 生成器
在传统的 Web 开发流程,你将需要花大量的时间给你的 webapp 建立样板代码,下载依赖,并手动创建应用的文件夹结构。现在这一切交给 Yeoman 生成器来做!下面安装 AngularJS 的生成器
##安装 AngularJS 的生成器
Yeoman 生成器使用 npm 命令,现在可用的生成器数量已经超过了 1000+个生成器,这其中很多都是由开源社区编写的
安装 generator-angular 生成器
$ npm install –global [email protected]
0.9.5 指版本号
使用脚手架
Yeoman 脚手架,会根据你的具体配置要求自动生产应用文件。
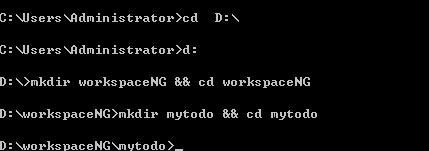
##创建项目文件夹
在你的工作区间(可以是任意目录)创建项目文件夹 mytodo(可以是任意项目名称),并且切换到该应用文件夹目录下
$ mkdir mytodo && cd mytodo
本例的工作目录是D:\workspaceNG
##使用生成器
查看所有的生成器
$ yo
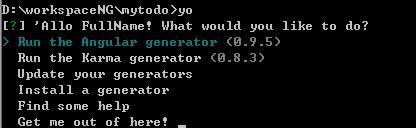 键盘上下键选中 angular 的生成器,点击
 enter 键
当你熟悉了你的生成器之后,可以使用快速命令
$ yo angular
##配置生成器
一些生成器也会提供一些有共同开发库(common developer libraries)的可选配置来定制你的应用,能够加速初始化你的开发环境。 generator-angular 会询问你需不需要使用 Sass (使用 Compass)或者Twitter Bootstrap,使用’n’和’y’进行选择。本例不要用 Sass ,而选用 Bootstrap

接着选用 Angular 模块。你可以使用空格键来取消项目。(当你在试用空格的效果时,确保所有的模块都被标记为绿色)。我们选用默认值就可以(即全部选中)。
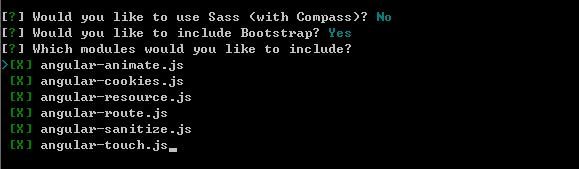
点击 enter 键,此时将会自动生成代码
预览 Yeoman 生成的应用

打开’mytodo’目录,会看到下面的文件结构:
- app: Web应用的父级目录。
- index.html: Angular应用的基准HTML文件
- 404.html, favicon.ico, and robots.txt: 通用的Web文件,Yeoman已经将它创建出来了,你不需要再手动去创建
- scripts: JS 文件夹
- app.js: Angular 主程序
- controllers: Angular 控制器
- styles: CSS 文件夹
- views: Angular模板
-
bower_components, bower.json:存放项目相关的JavaScript或Web依赖,由bower安装的
-
Gruntfile.js, package.json, and node_modules: Grunt需要使用的依赖以及配置
- test: 测试框架以及针对这个项目的单元测试,包括了为控制器写的样板测试(boilerplate tests)
另外:示例中的所有 js 代码都使用了严格模式,有关严格模式的内容可以参考http://www.waylau.com/javascript-use-strict-mode/
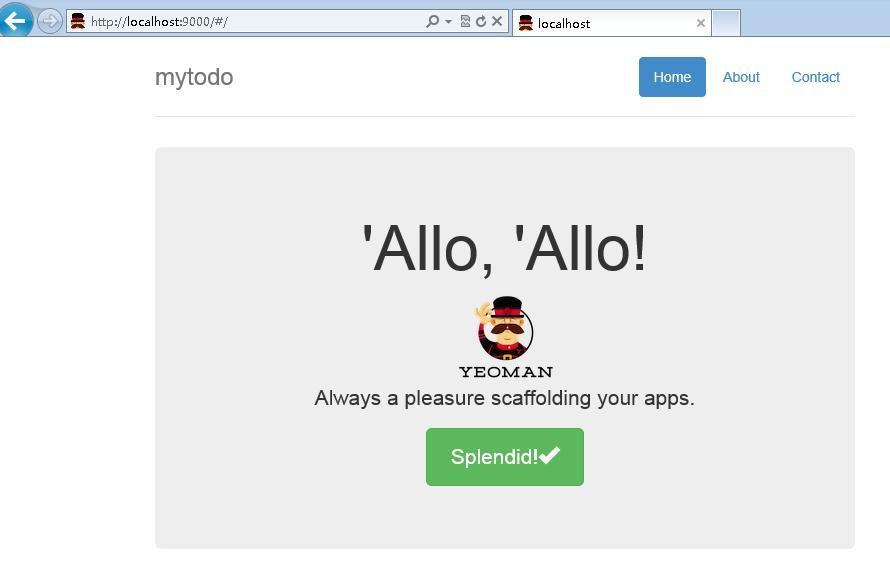
浏览器中预览应用
无需在你的电脑中安装 web 服务器,Yeoman 已经包含了。
##启动服务
$ grunt serve
浏览器访问 localhost:9000 (或者 127.0.0.1:9000 )
##关闭服务
使用 Ctrl+C 键
##查看文件
现在可以打开编辑器开始更改应用。每次保存更改后,浏览器将会自动刷新,就是说你是不需要手动再刷新浏览器了。这个被称作live reloading,这提供了一个很好的方式来实时查看应用的状态。它是通过一系列的 Grunt 任务(配置在 Gruntfile.js )来监视你的文件的更改情况,一旦发现文件被改动了,live reloading就会自动刷新应用。在这个例子中,我们编辑了 main.html,通过 live reloading 我们从下面的状态:
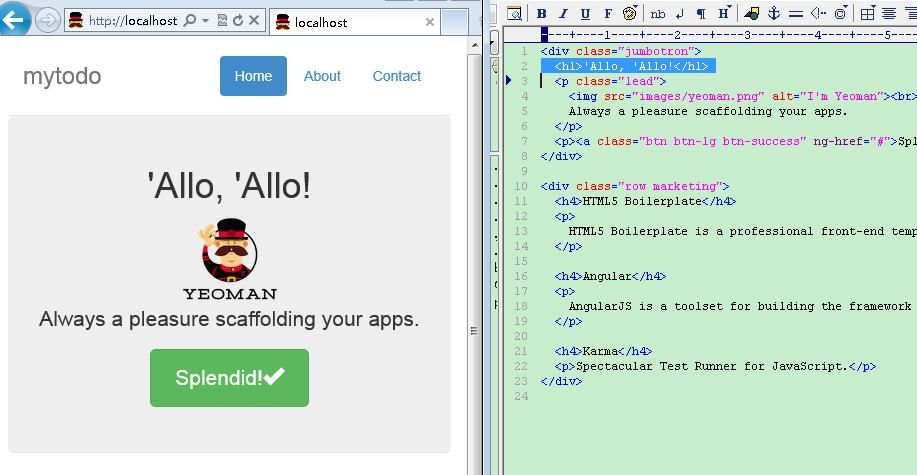
马上到了这个状态:
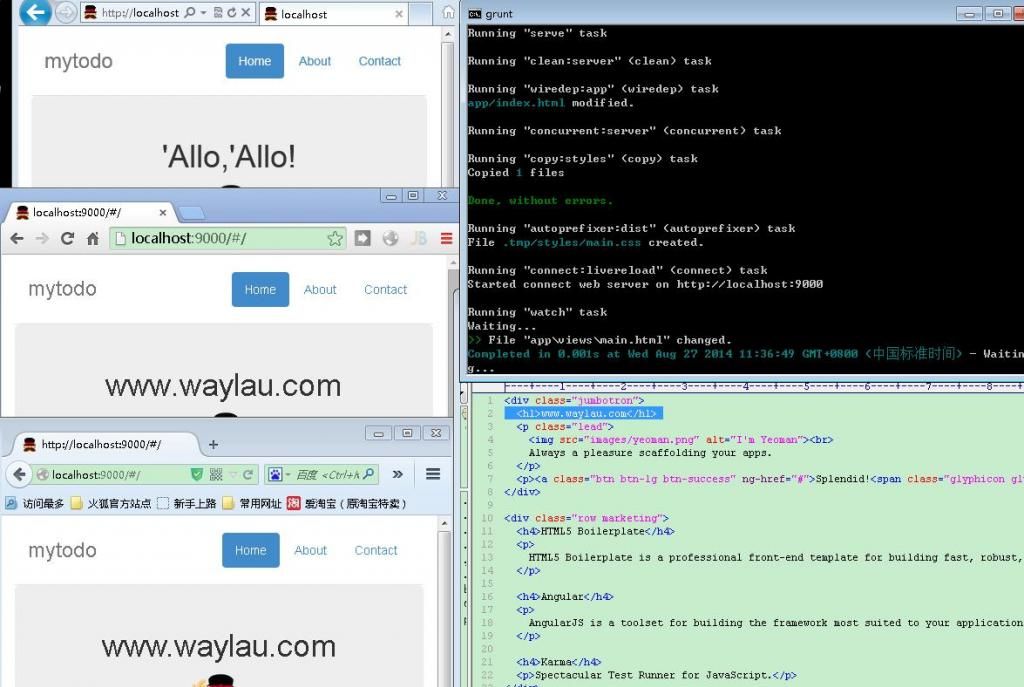
(PS:在各个浏览器测试中,老旧的浏览器可能不会自动刷新页面,比如IE9)
写一个自己的 AngularJS 应用
这里 Yeoman 提供最终的项目源码,如果打不开(国外网站,可能被墙),也可以访问笔者的项目源码https://github.com/waylau/mytodo
##创建新模板展现 Todo 列表
打开views/main.html
除了 <div class="jumbotron"> 其他标签都清除了。并把 jumbotron 改名为 container,最终代码是这样的
<div class="container">
</div>
打开 scripts/controllers/main.js
代码修改为,todos 为 列表容器:
'use strict';

angular.module('mytodoApp')
  .controller('MainCtrl', function ($scope) {
    $scope.todos = ['Item 1', 'Item 2', 'Item 3'];
  });
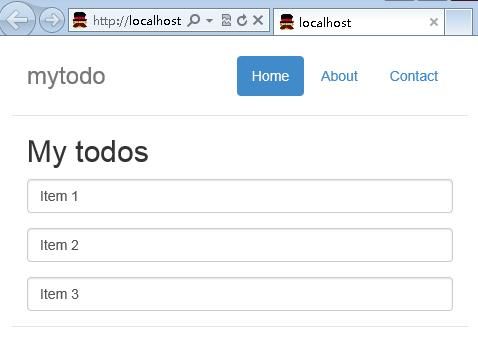
修改 main.html,将todos 中的项目以input标签形式输出:
<div class="container">
  <h2>My todos</h2>
  <p class="form-group" ng-repeat="todo in todos">
    <input type="text" ng-model="todo" class="form-control">
  </p>
</div>
在 p 标签中的 ng-repeat 属性是一个 Angular 指令 (directive),当获取到一个集合(collection)中的项时,它将项实例化。
在我们的例子中,你可以想象一下,每个 p 标签和它的内容都带着这个’ng-repeat‘属性。对于每个在todos数组中的项,Angular都会生成一组新的 <p><input></p>
ng-model 是另一个 Angular 指令,它主要是和input、select、textarea 标签和一些自定义控件一起使用,达到数据双向绑定的效果。在我们的例子中,它用于显示一系列带有todo的值的文本输入域。
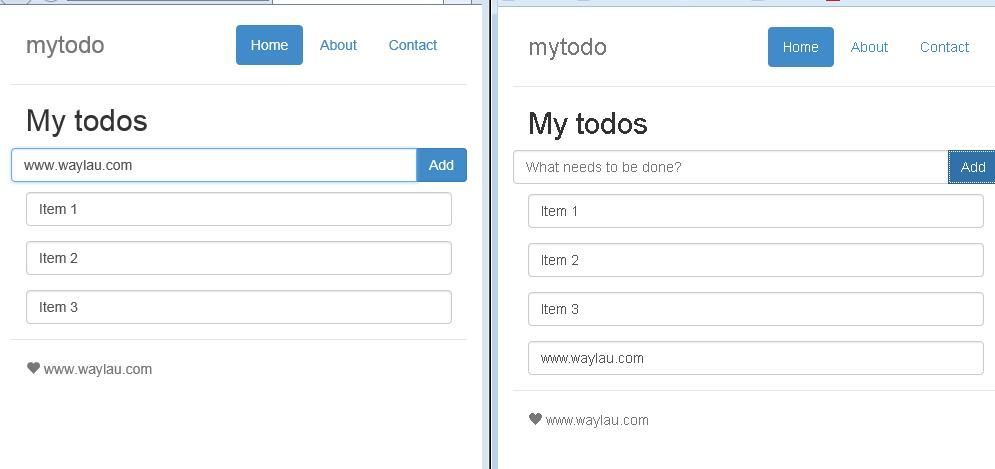
在浏览器中查看ng-repeat和ng-model动态变化的效果。在保存之前,我们的应用看起来应该是下图这个样子的:
更新 $scope.todos,增加第四个项目
$scope.todos = ['Item 1', 'Item 2', 'Item 3', 'Item 4'];
通过 live reloading 我们看到页面新的项目出现了。移除第四个项目,则页面也移除了。
##增加一个 todo 项目
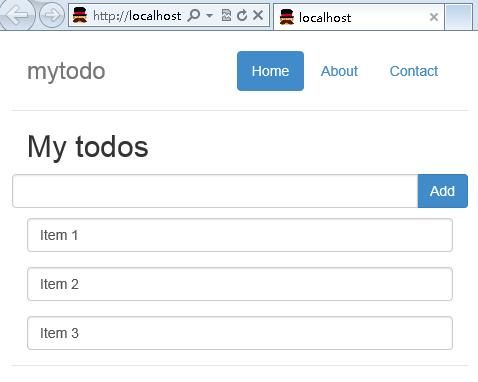
下面将实现添加一个 todo 到列表中,修改 main.html:在h2 元素和 p 元素之间加上一个 form 元素。现在你的 main.html 应该是下面这个样子:
<div class="container">
  <h2>My todos</h2>

  <!-- Todos input -->
  <form role="form" ng-submit="addTodo()">
    <div class="row">
      <div class="input-group">
        <input type="text" ng-model="todo" placeholder="What needs to be done?" class="form-control">
        <span class="input-group-btn">
          <input type="submit" class="btn btn-primary" value="Add">
        </span>
      </div>
    </div>
  </form>
  <p></p>

  <!-- Todos list -->
  <p class="form-group" ng-repeat="todo in todos">
    <input type="text" ng-model="todo" class="form-control">
  </p>
</div>
在页面顶部增加了一个带有提交按钮的表单。这个表单使用了另一个Angular指令 ng-submit。返回查看你的浏览器,现在的UI应该是下面这个这样子的:
点击 Add 按钮,啥事都不会发生,现在要做下改动:
ng-submit 是将一个 Angular 表达式绑定到表单的 onsubmit 事件上。如果 form 上没有绑定任何动作,它也会阻止浏览器的默认行为。在我们的例子中,我们添加了一个 addTodo() 表达式。
下面的 addTodo 方法是实现将新增的 todo 项目添加入已有的事项列表中,然后清空顶部的文本输入域:
$scope.addTodo = function () {
  $scope.todos.push($scope.todo);
  $scope.todo = '';
};
将 addTodo() 方法加到 main.js 的 MainCtrl 控制器的定义中,现在你的控制器代码应该如下所示:
'use strict';

angular.module('mytodoApp')
  .controller('MainCtrl', function ($scope) {
    $scope.todos = ['Item 1', 'Item 2', 'Item 3'];
    $scope.addTodo = function () {
      $scope.todos.push($scope.todo);
      $scope.todo = '';
    };
  });
添加一个文本进去看下效果:
注意:本例只是一个简单的演示,未对输入做验证
##移除一个 todo 项目
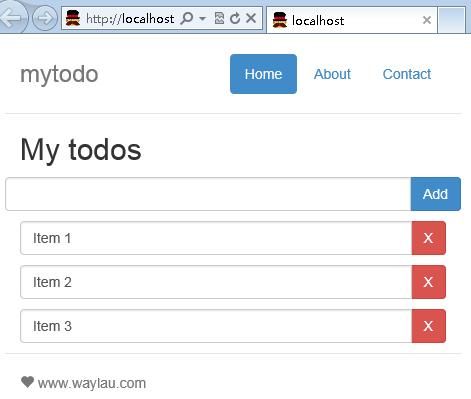
现在来添加一个移除 todo 项目的功能,先在列表中每一个 todo 项目的边上加上一个 移除 按钮。回到我们的视图模板(main.html),在现有的 ng-repeat 指令上添加一个按钮。然后确认我们的输入框和移除按钮是对齐的,将 p 标签的 class 从 form-group 改成 input-group。 再改动之前代码是这样的:
<!-- Todos list -->
<p class="input-group" ng-repeat="todo in todos">
  <input type="text" ng-model="todo" class="form-control">
  <span class="input-group-btn">
    <button class="btn btn-danger" ng-click="removeTodo($index)" aria-label="Remove">X</button>
  </span>
</p>
回到浏览器,现在你的应用看起来有点靓了哦!
上面的代码中使用了一个新的 Angular 指令 ng-click。可以用 ng-click 来控制元素被点击时的行为。在这个例子中,我们调用了removeTodo() 方法并将 $index 传入了这个方法。
$index 的值是当前 todo 项在整个 todos 数组中的位置的索引值。举个例子,数组中的第一项的索引值是0,那么0就会被传入removeTodo();类似的,在一个五项的Todo列表中,最后一项的索引值是4,4就会被传入 removeTodo()。
现在我们来实现这个 removeTodo() 方法,下面的代码是使用 JavaScript 中的 splice 方法将要移除的项通过给定的 $index 值从数组中移除:
$scope.removeTodo = function (index) {
  $scope.todos.splice(index, 1);
};
完整的 main.js 代码如下:
'use strict';

angular.module('mytodoApp')
  .controller('MainCtrl', function ($scope) {
    $scope.todos = ['Item 1', 'Item 2', 'Item 3'];
    $scope.addTodo = function () {
      $scope.todos.push($scope.todo);
      $scope.todo = '';
    };
    $scope.removeTodo = function (index) {
      $scope.todos.splice(index, 1);
    };
  });
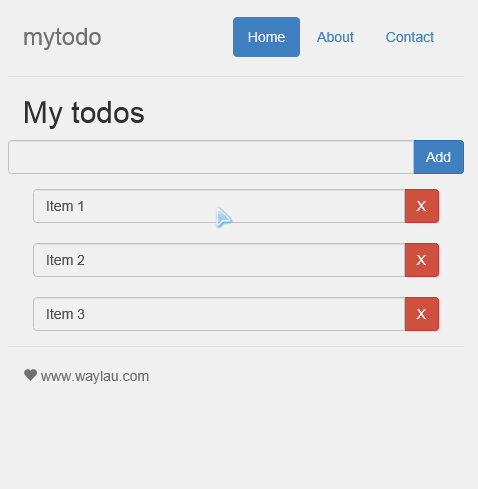
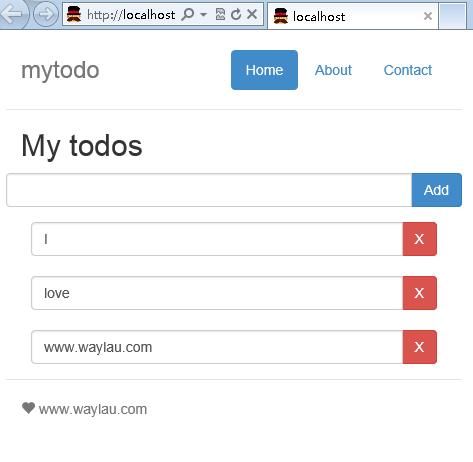
回到浏览器,现在你可以点击移除按钮将一个 todo 项从列表中移除。有点屌!
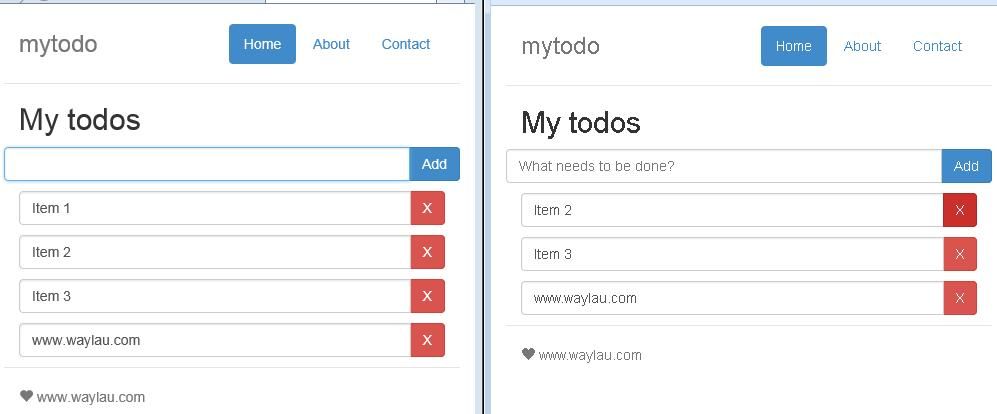
虽然我们可以添加和移除Todo事项,但是这些记录都不能永久地保存。一旦页面被刷新了,更改的记录都会不见了,又恢复到 main.js 中设置的todo 数组的值。不过不要担心这个问题,之后会讲到更多关于使用 Bower 安装包,这个问题就会被解决的。
使用 Bower 安装包
现在给我们的列表添加一些排列方式来合理地显示它。所以我们要使用Bower 安装了一个 Angular 组件,叫做AngularUI Sortable module。
##列出已经安装的包
用下面的指令我们可以检查现在已经安装上的包:
$ bower list
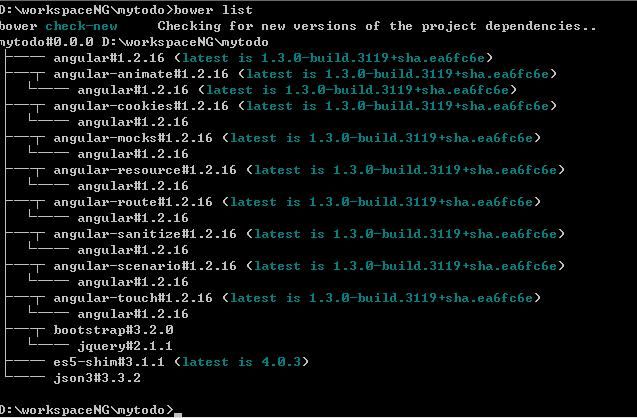
在项目初始化配置的时候,我们已经将包添加进了项目
##查询包
查找angular-ui-sortable包,确认有 AngularUI 的包可以使用
$ bower search angular-ui-sortable
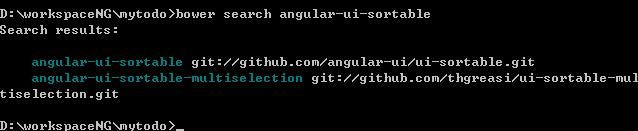
结果搜到两个记录,我们需要的是第一个
同时,我们还要安装另外一个jQuery UI,包名是”jquery-ui”.
进行包的安装:
$ bower install –save angular-ui-sortable
$ bower install –save jquery-ui
用 --save 更新 bower.json 文件中关于angular-ui-sortable和jquery-ui的依赖,这样你就不用手动去 bower.json 中更新依赖了。
也可以用下面的命令,将多个包一起安装
$ bower install –save angular-ui-sortable jquery-ui

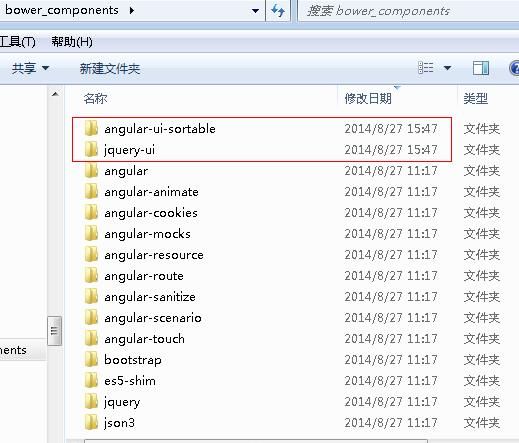
##确认安装
看一下你的 bower_components 目录是不是所有包都已经检出下来了,你可以看到 jquery-ui 和 angular-ui-sortable 出现在之前已经安装的Angular包边上了:
##让 todos 应用可排序
这些新安装的依赖要被添加进我们的 index.html 文件。你可以手动添加,不过其实Yeoman会自动添加上。先在命令行中使用Ctrl+c,退出当前的进程。再次运行:
$ grunt serve
可以看到,新的包已经添加进来了
<!-- build:js(.) scripts/vendor.js -->
<!-- bower:js -->
<script src="bower_components/jquery/dist/jquery.js"></script>
<script src="bower_components/angular/angular.js"></script>
<script src="bower_components/json3/lib/json3.js"></script>
<script src="bower_components/bootstrap/dist/js/bootstrap.js"></script>
<script src="bower_components/angular-resource/angular-resource.js"></script>
<script src="bower_components/angular-cookies/angular-cookies.js"></script>
<script src="bower_components/angular-sanitize/angular-sanitize.js"></script>
<script src="bower_components/angular-animate/angular-animate.js"></script>
<script src="bower_components/angular-touch/angular-touch.js"></script>
<script src="bower_components/angular-route/angular-route.js"></script>
<script src="bower_components/jquery-ui/jquery-ui.js"></script>
<script src="bower_components/angular-ui-sortable/sortable.js"></script>
<!-- endbower -->
<!-- endbuild -->
为了使用Sortable模块,我们需要在 scripts/app.js 中更新Angular 模块,将 Sortable 可以加载到我们的应用中,更改前代码,
将 ui.sortable 添加进数组中,如下:
angular
  .module('mytodoApp', [
    'ngAnimate',
    'ngCookies',
    'ngResource',
    'ngRoute',
    'ngSanitize',
    'ngTouch',
    'ui.sortable'
  ])
最后,在 main.html 中,我们需要将 ui-sortable 指令作为一个div 将 ng-repeat 层包起来。
<!-- Todos list -->
<div ui-sortable ng-model="todos">
  <p class="input-group" ng-repeat="todo in todos">
添加一些内联的CSS,将鼠标显示为“可移动”样式来告诉用户这些 todo 项是可以移动的:
<p class="input-group" ng-repeat="todo in todos" style="padding:5px 10px; cursor: move;">
完整代码如下:
<!-- Todos list -->
<div ui-sortable ng-model="todos">
  <p class="input-group" ng-repeat="todo in todos" style="padding:5px 10px; cursor: move;">
    <input type="text" ng-model="todo" class="form-control">
    <span class="input-group-btn">
      <button class="btn btn-danger" ng-click="removeTodo($index)" aria-label="Remove">X</button>
    </span>
  </p>
</div>
效果如下:
用 Karma 和 Jasmine 进行测试
Karma是一个JS测试框架。Angular生成器本身已经包括了两个测试框架:ngScenario 和Jasmine。当之前我们运行yo angular 的时候,在 mytodo 文件夹下会生成了一个 test 目录,还有一个 karma.conf.js 文件,它会被放入在 Node 模块中以使用Karma。我们将会编辑一个 Jasmine 脚本来完成我们的测试。现在先来看看要怎么进行测试。
##执行单位测试
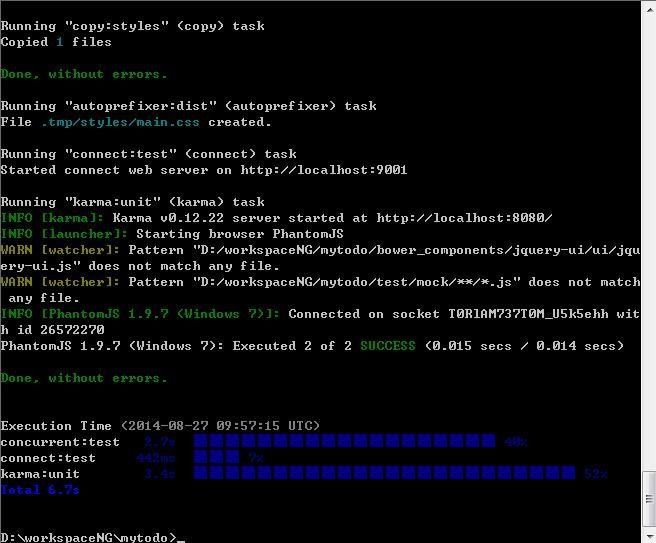
现在回到命令行结束 grunt server 的进程(使用 Ctrl+c)。在Gruntfile.js中已经有了用于运行测试的grunt任务,可以直接像下面这样运行:
$ grunt test
之后在控制台会看到几条警告信息,测试失败,不要紧,下面进行修正。
##更新 Karma 配置
首先, 修改 karma.conf.js,添加
  'bower_components/jquery/dist/jquery.js',
  'bower_components/jquery-ui/ui/jquery-ui.js',
  'bower_components/angular-ui-sortable/sortable.js',
最终的样子是:
files: [
  'bower_components/angular/angular.js',
  'bower_components/angular-mocks/angular-mocks.js',
  'bower_components/angular-animate/angular-animate.js',
  'bower_components/angular-cookies/angular-cookies.js',
  'bower_components/angular-resource/angular-resource.js',
  'bower_components/angular-route/angular-route.js',
  'bower_components/angular-sanitize/angular-sanitize.js',
  'bower_components/angular-touch/angular-touch.js',
  'bower_components/jquery/dist/jquery.js',
  'bower_components/jquery-ui/ui/jquery-ui.js',
  'bower_components/angular-ui-sortable/sortable.js',
  'app/scripts/**/*.js',
  'test/mock/**/*.js',
  'test/spec/**/*.js'
],
##更新单位测试
打开test/spec/controllers/main.js,这个是测试 MainCtrl 控制器的。这个测试样本还是引入了之前老项目的代码,需要进行修改,将
it('should attach a list of awesomeThings to the scope', function () {
  expect(scope.awesomeThings.length).toBe(3);
});
改为
it('should have no items to start', function () {
  expect(scope.todos.length).toBe(0);
});
打开scripts/controllers/main.js,清空 todos 数组
$scope.todos = [];
执行测试
$ grunt test
测试通过,效果如下:
##添加更多单位测试
上面例子只测试了部分方法,可以再多加:
it('should add items to the list', function () {
  scope.todo = 'Test 1';
  scope.addTodo();
  expect(scope.todos.length).toBe(1);
});

it('should add then remove an item from the list', function () {
  scope.todo = 'Test 1';
  scope.addTodo();
  scope.removeTodo(0);
  expect(scope.todos.length).toBe(0);
});
MainCtrl 控制器完整的测试文档(test/spec/controllers/main.js),如下:
'use strict';

describe('Controller: MainCtrl', function () {

  // load the controller's module
  beforeEach(module('mytodoApp'));

  var MainCtrl,
    scope;

  // Initialize the controller and a mock scope
  beforeEach(inject(function ($controller, $rootScope) {
    scope = $rootScope.$new();
    MainCtrl = $controller('MainCtrl', {
      $scope: scope
    });
  }));

  it('should have no items to start', function () {
    expect(scope.todos.length).toBe(0);
  });

  it('should add items to the list', function () {
    scope.todo = 'Test 1';
    scope.addTodo();
    expect(scope.todos.length).toBe(1);
  });

  it('should add then remove an item from the list', function () {
    scope.todo = 'Test 1';
    scope.addTodo();
    scope.removeTodo(0);
    expect(scope.todos.length).toBe(0);
  });

});
测试通过,效果如下:
屌爆了!
当项目变大,开发人员不断加入的时候,编写单元测试更容易捕捉 BUG,Yeoman 的脚手架功能使编写单元测试更容易,所以没有理由不写自己的测试!;)b
准备发布产品
##为产品优化文件
为了将应用发布为产品版本,还需要做很多工作:
- 校验我们的代码
- 运行我们的测试
- 合并和缩小脚本和样式来减少网络请求
- 优化任何使用到的图像
- 对所有输出进行编译处理,使程序瘦身
呦西~实现上述目标只需一句:
$ grunt
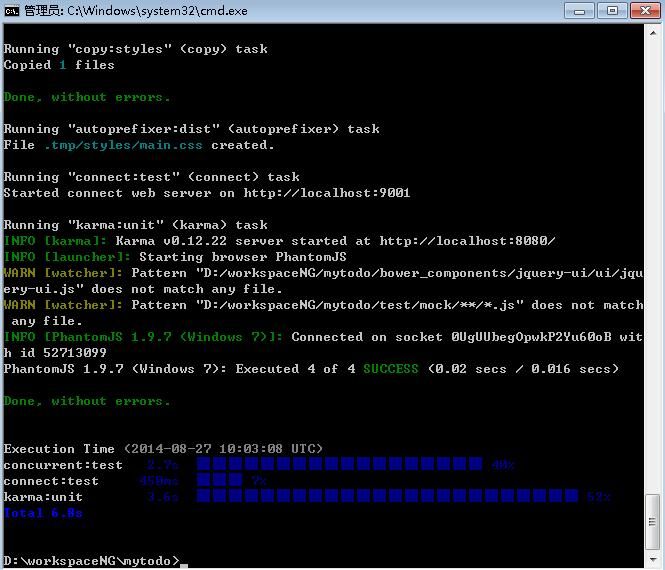
这个命令将会完成 Grunt 的任务以及根据 Gruntfile.js 文件进行配置,创建一个可以运行的应用版本。只需等上一分钟,你就能得到一个完整的编译版本,和一份编译过程耗时的报告。
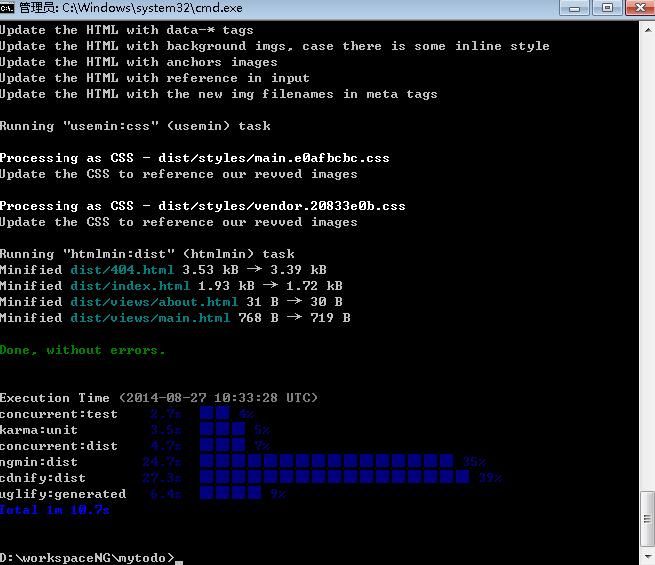
编译完成后的文件,放在了 dist 目录下,是一个可以拿去服务器上的部署的真正的产品。
##编译和预览应用产品
执行一句
$ grunt serve:dist
它会自动编译项目,并且启动 web 服务器 。Yo 真是牛!
本地存储来持久化数据
之前项目的数据,当浏览器刷新后就不会保存了。现在扯下数据持久化。
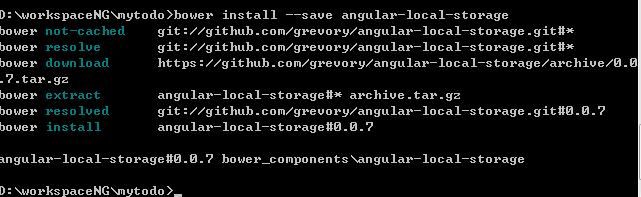
##安装 Bower 包
安装 Angular 模块 angular-local-storage,让我们快速实现本地存储(local storage)
执行
$ bower install –save angular-local-storage
##添加本地存储 关闭线程,重启服务
$ grunt serve
index.html 页面会自动引入包
<script src="bower_components/angular-local-storage/angular-local-storage.js"></script>
编辑 scripts/app.js 添加 LocalStorageModule的 适配器:
angular
  .module('mytodoApp', [
    'ngAnimate',
    'ngCookies',
    'ngResource',
    'ngRoute',
    'ngSanitize',
    'ngTouch',
    'ui.sortable',
    'LocalStorageModule'
])
同时也要配置 localStorageServiceProvider,用ls为 localStorage名称前缀这样你的应用程序不会碰巧读到,从另一个应用程序使用相同的变量名:
.config(['localStorageServiceProvider', function(localStorageServiceProvider){
  localStorageServiceProvider.setPrefix('ls');
}])
完整的文件:
'use strict';

angular
  .module('mytodoApp', [
    'ngAnimate',
    'ngCookies',
    'ngResource',
    'ngRoute',
    'ngSanitize',
    'ngTouch',
    'ui.sortable',
    'LocalStorageModule'
  ])
  .config(['localStorageServiceProvider', function(localStorageServiceProvider){
    localStorageServiceProvider.setPrefix('ls');
  }])
  .config(function ($routeProvider) {
    $routeProvider
      .when('/', {
        templateUrl: 'views/main.html',
        controller: 'MainCtrl'
      })
      .when('/about', {
        templateUrl: 'views/about.html',
        controller: 'AboutCtrl'
      })
      .otherwise({
        redirectTo: '/'
      });   });
需要在你的控制器scripts/controllers/main.js 中声明对本地存储服务的依赖。将localStorageService作为第二个传入参数添加到你的回调函数中。
'use strict';

angular.module('mytodoApp')
  .controller('MainCtrl', function ($scope, localStorageService) {
    // (code hidden here to save space)
  });
现在,todo 项就不是从静态的数组中读取的,将会从本地存储里读取然后再将它们存入$scope.todos 中。 我们还需要使用 Angular 的 $warch 监听器来监听 $scope.todos 的值得变化。如果有人添加或者删减了 todo 项目,本地存储中的数据也会被同步
因此,我们需要将现在的 $scope.todos 声明删掉:
$scope.todos = [];
替换为:
var todosInStore = localStorageService.get('todos');

$scope.todos = todosInStore && todosInStore.split('\n') || [];

$scope.$watch('todos', function () {
  localStorageService.add('todos', $scope.todos.join('\n'));
}, true);
完整的代码:
'use strict';

angular.module('mytodoApp')
  .controller('MainCtrl', function ($scope, localStorageService) {

    var todosInStore = localStorageService.get('todos');

    $scope.todos = todosInStore && todosInStore.split('\n') || [];

    $scope.$watch('todos', function () {
      localStorageService.add('todos', $scope.todos.join('\n'));
    }, true);

    $scope.addTodo = function () {
      $scope.todos.push($scope.todo);
      $scope.todo = '';
    };

    $scope.removeTodo = function (index) {
      $scope.todos.splice(index, 1);
    };

  });
在浏览器中查看应用,你会发现 todo 列表中没有任何东西。因为这个应用从本地存储中读取了 todo 数组,而本地存储中还没有任何 todo 项。
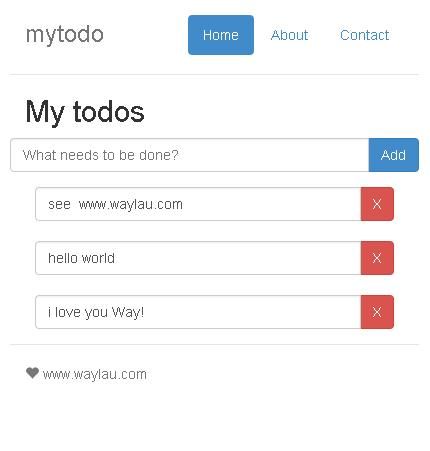
再来添加一些项目到列表中吧:
在当我们再次刷新我们的浏览器的时候,这些项目都还在。哦也~
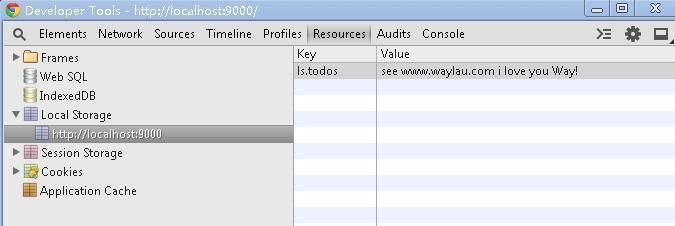
在Chrome浏览器 按 F12 ,弹出开发工具(Chrome DevTools)中的 Resources 面板里确认我们的数据是不是真的被永久储存在本地存储中。在资源面板的左侧里选中Local Storage:
更多有关单位测试的,可以移步至Unit Testing Best Practices in AngularJS
总结
##Yeoman 可以做更多
Yeoman 支持 包括 Angular 在内的其他框架的脚手架。
Anugular生成器也支持创建新的视图、指令和控制器。可以通过运行 yo angular:route routeName 搭建一个新的控制器,同时在 app.js 中的路由也会被更新。在可能使用单元测试的地方,我们也会试图搭建测试。
了解更多有关于 Angular 生成器的 Yeoman 命令,请查看generator readme。
##下步工作
- AngularJS 帮助我们写 todo 应用程序快速和优雅。深入挖掘用AngularJS的甜蜜点.详细的文档
- Grunt提供了几乎所有与你的应用交互的服务,包括编译CoffeeScript或者与像 PHP 或者 Express 编写的中间层连接。你的 Yeoman 已经生成了Gruntfile.js,所以你要做的就是看一看如何配置Grunt tasks
- Bower上可以获取的包的资源越来越多,可以在这里查看所有的包
- Yeoman 会持续更新。查看yeoman.io获取更多信息,也可以关注@yeoman和+Yeoman
参考
源码
这里 Yeoman 提供最终的项目源码,如果打不开(国外网站,可能被墙),也可以访问笔者的项目源码https://github.com/waylau/mytodo